
Layout Your Bag Design

STEP 1
Load the Wompy Bag Design Software
To get started, visit www.wompybike.com/design.
This design tool will allow you to create your bag design and generate all the files that we need to fabricate your bag. It will provide us with the cut files needed for laser cutting the fabric panels and the print files to create our dye sublimation transfers.

STEP 2
Take Picture of your Bike
The first step in the software is to upload a photo of your bike that we can use to design the mark out the edges of the bag to ensure we have a perfect fit. If you have a Wompy Sizing Postcard, make sure that you tape this to your bike before taking the picture (as shown in the image).
To get the best quality photo:
Stand approximately 10 feet away
Get down level with the bike
Set your phone to 1X Zoom
Try to take the photo as straight on as possible

STEP 3
Upload Picture & Scale to Fit Window
Once you upload the photo, you’ll notice that there is a toolbar that pops up in the top left corner of your image. Use this toolbar to adjust the size and location of your bike image.
Our goal is to fill the preview window with as much of your frame as possible to give us the most precise position of each of the corners of the bag.

STEP 4
Calibrate the Bike Frame Image
Next, we need to determine the size of your bike frame so we know the exact dimensions of your bag. There are two different ways to do this:
SIzing Postcard - If you have a Sizing Postcard, you’ll want to tape this to your bike before you take your picture. While in the software, it will prompt you to click on one of the pink circles. This circle will turn green indicating that it has properly detected the postcard. You can also print off your own postcard to use if you don’t have one that we’ve sent you.
Tape Measure - If you don’t have a Sizing Postcard, or a printer, you can also do this step manually with a tape measure. The Software will prompt you to mark out two points on the image of the underside of the top tube of your bike, and then physically measure that distance on your real bike.

STEP 5
Mark out perimeter of the Bag
In this step you get to decide the shape and style of the bag that you want. At each corner of the bag, place a point. These points will form the perimeter of your bag. You can drag the points around as needed and use the UNDO button if you need to remove the last point you placed.
Our ideal placement is as close to the frame while remaining inside the shape. Ultimately, we are making a fabric bag, so there is a little bit of wiggle room for the bag to stretch when laced onto your bike.
Try to avoid doing really small line segments and in general, minimize the number of lines that you use.
You can view a description of some of the typical styles of bags here: https://www.wompybike.com/bag-types

STEP 7
Select Features
Currently, the only option is to add a Map Pocket to the bag, which produces a secondary thinner zipper pocket on the opposite side of the main compartment.

STEP 8
Customize Fabric
Since we will be transferring our dye pattern to the fabric for each bag, we can customize the panels to the exact fabric style that you would like. We have three options for what you can choose from:
Solid color - Using the color spectrum, you can select the exact color that you would like. You can also use the Eyedropper tool to select a color from your picture to color match your bag and bike perfectly.
Select a Pattern - There are various patterns that we have provided for your to choose from.
Upload your own design - You can also upload your own photo if there is a pattern that you would prefer. Just make sure it is high resolution (at least 750 x 750 pixels).
STEP 9
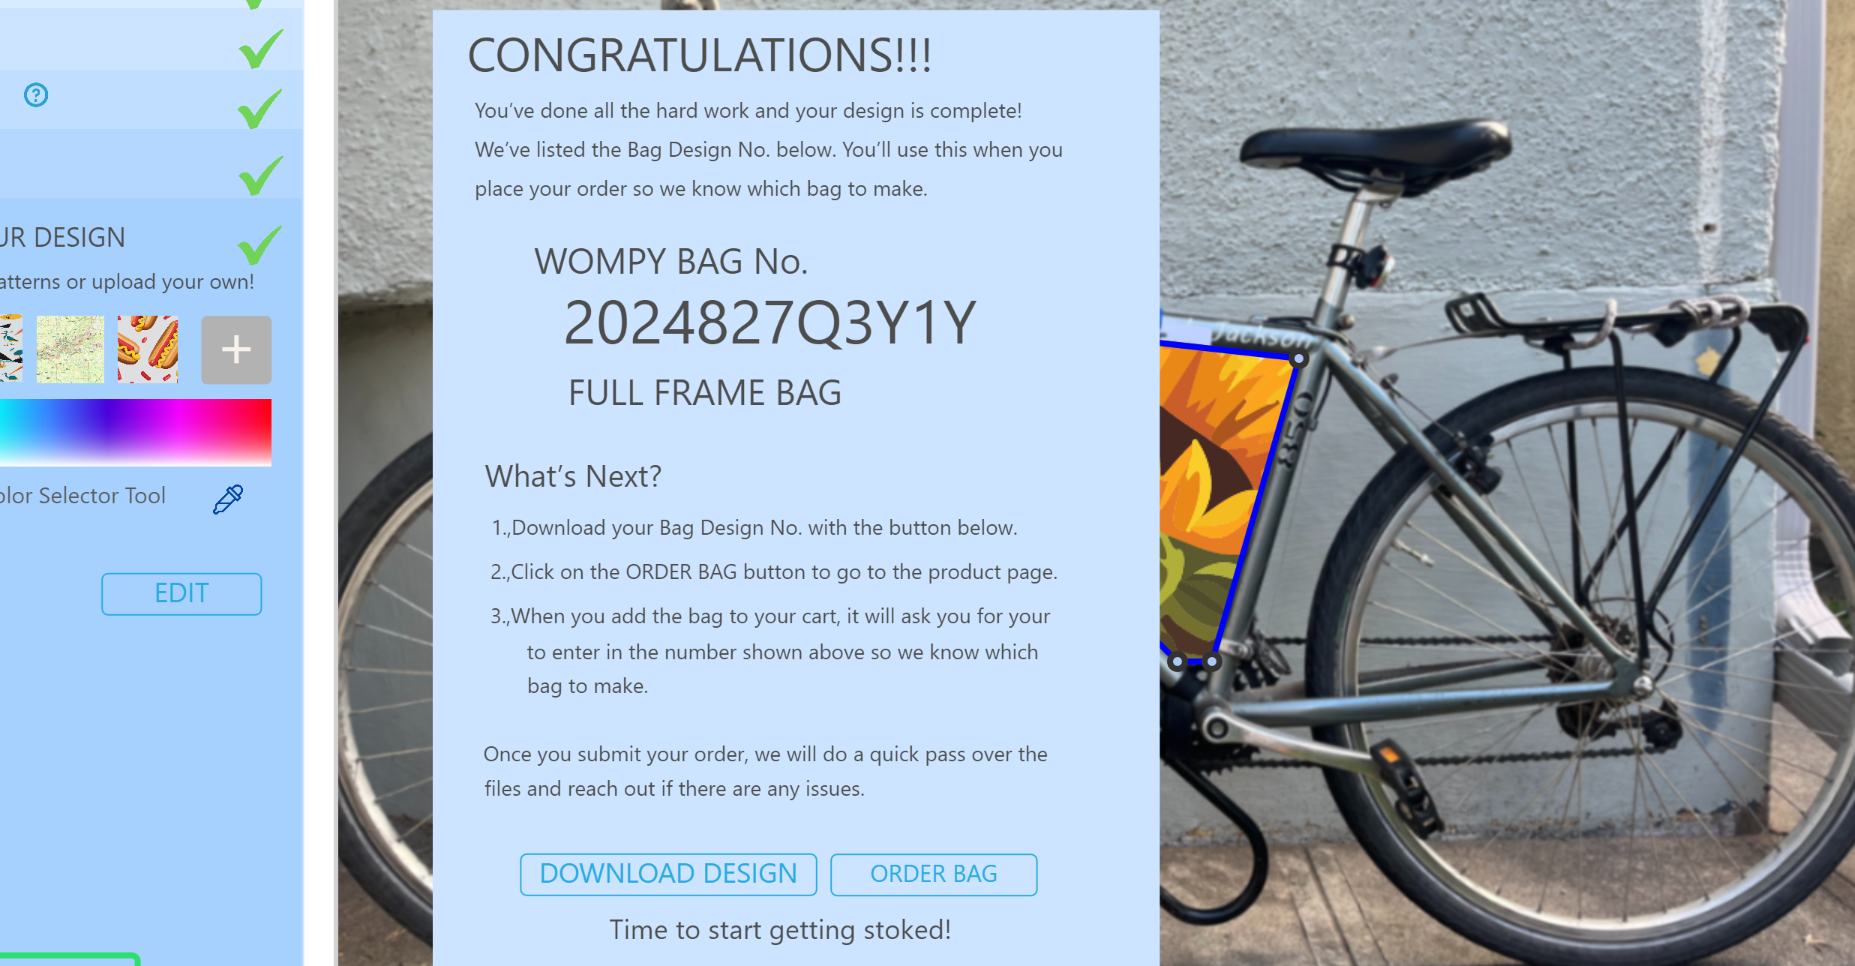
Submit & Save Design No.
Once you have completed all these steps, and you like how your design is looking, you are ready to generate your design. Click that “Generate Design” button and the software will upload your files to our server and provide you with a reference number. You can use this number to purchase the design you created or if you need to reference this design later.
The software should automatically start a download of a receipt for you.